Have you ever noticed that using your 8GB or 16GB USB flash drives(pendrive) to copy larger single having having more than 4GB? If you have done so then you might get some windows error message stating that You don’t have enough space.(such as: There is not enough free space on the drive, or similar.) Does this sound familiar?
If you have faced such a problem, most probably it’s caused by the fact that your flash drive comes with FAT32 file system from factory. This type of a file system has a built-in limitation on the size of the files that it may contain. Although the total size of the files that you can copy to a FAT32 drive could be as large as 2TB (or the physical capacity of the drive, whichever is smaller), the size of each individual file may not exceed 4GB.Such file system (FAT32/FAT) will not support copying file which is greater than 4GB.Here i want to mention that I am talking about file size of single file should not exceed 4GB.
This limitations is quite unwanted in present context but when FAT32 was designed no body anticipated that we would deal with large files as we are dealing today.Or, maybe the designers hoped that by the time such large files become common, the use of the FAT32 system would be replaced by the more modern systems.
But in any case we need to resolve the solution . This problem can be solved using NTFS file system.The latter does not have the 4GB file size limitation, and it also allows for many other functions not supported by FAT32: file security, encryption, compression, etc.
On the other side there are some limitations of NTFS also the older versions of Windows (such as Windows 95, 98, or Windows Millennium do not support the NTFS file system. If you plan on using the drive with such old computers, then DO NOT format the drive with NTFS, because you won’t be able to get the old Windows to recognize it anyway. If, however, you only plan on using the drive with the more recent versions of Windows, such as Windows 2000, Windows XP, Windows Vista, and of course Windows 7, such computers should work with the NTFS drives just fine.
Now I am going to tell you how you can change your FAT32 USB devices to NTFS in Windows Xp. Normally it is very easy in case of Windows vista/Windows 7 but it is little bit tricky in case of Windows Xp
By default Windows Xp will not allow you to format USB to NTFS. When you select “Format” in context menu of USB drive there you won’t have any option for NTFS.
Step to enable NTFS format of USB in Windows XP
1. Insert the USB flash drive into the USB port.
2. Click Start, type devmgmt.msc in the Search textbox and press Enter.
3. Find Disk Drives and expand it.
4. Find the USB flash drive you want to format, and double-click it. It opens the Properties dialog box.
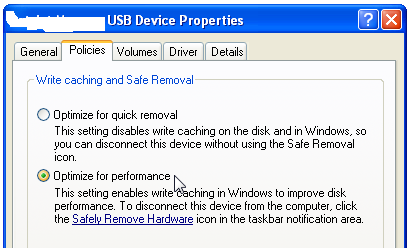
5. Click Policies tab.
6. By default, the Optimize for quick removal option selected, switch it to Optimize for performance and then pressOK.
7. Now open My Computer. Right click on the USB Flash Drive and select Format. The Format dialog box now appears.
8. Select NTFS in the File System field.
9. Press Start and wait while the process will be completed.
10. Now your USB Flash Drive is formatted with NTFS format.
Steps to format USB in Windows vista/Windows 7
1. Insert the USB flash drive into the USB port.
2. Now open My Computer. Right click on the USB Flash Drive and select Format. The Format dialog box now appears.
3. Select NTFS in the File System field.
4. Press Start and wait while the process will be completed.
5. Now your USB Flash Drive is formatted with NTFS format.
There may come a day that optical drives are as hard to find as 5.25 floppy drives are today.
WinToFlash starts a wizard that will help pull over the contents of a windows installation CD or DVD and prep the USB drive to become a bootable replacement for the optical drive. It can also do this with your LiveCD.
You don’t have to worry about scratches on the disc or misplacing your original media discs once you transfer their contents to the flash drive. The optical drive is quickly becoming a thing of the past, especially in office environments, as media is shifted to the cloud.
WinToFlash is a free and easy to use application that does something very useful: it helps you create a bootable USB installer for your Windows operating system. It basically takes your Windows installation disk and ports it to an USB stick.
Additional information on WinToFlash is available here.
The problem with having a Windows installation disk on a CD or DVD is that the aforementioned CD or DVD could get damaged. You could crack the disk or you could scratch it badly, thus making it unusable. Another problem is that it can be a bother to walk around with a CD or DVD in your pocket – especially when you take into consideration the fact that instead of a cumbersome CD or DVD, you could walk around with a tiny USB drive (or USB stick or Flash drive or whatever else you want to call it).
It is a lot more convenient to walk around with an USB installer for Windows instead of a CD or DVD. USB sticks are easier to carry around and they don’t get scratches on them which make them unusable. Those two facts alone are reason enough for me to want to ditch a Windows CD or DVD and move to an USB stick instead.
There is a very simple way to do so: get the right piece of software and you can easily turn a Windows CD or DVD to an USB installer. That “right piece of software” is the Novicorp-developed and appropriately named WinToFlash. What this application does is it takes the contents of a Windows installation CD or DVD and moves them to an USB stick, turning that stick into a bootable USB installer for Windows. So instead of using a CD or DVD to install the Microsoft-developed Windows operating system, you can use the USB stick instead.
The functionality the WinToFlash has to offer is an exceptional fact on its own. What I also found to be exceptional is the fact that accessing the functionality WinToFlash has to offer is a very straightforward matter. You would think that creating an USB installer to replace your Windows installation disk would be a big pain in the unmentionables and for that reason you would be tempted to avoid performing such a task. You don’t have to stay with your classic Windows installation disk because you think it’s hard to set up an USB installer. The simple truth of the matter is that it is a piece of cake with WinToFlash. The application is user friendly and thanks to its wizard you will be done in no time.
It must be mentioned here that the application is free only for personal use. If you like WinToFlash and want to support its development, consider getting a Personal License for a mere $5. Get a license and you will no longer see the ads.
IT professionals who need extra features can purchase a Professional License. Businesses who want to use WinToFlash must purchase a Business License.
How To Boot From a USB Device?
You might want to boot from a USB device, like an external hard drive or a flash drive, for many different reasons.
When you boot from a USB device, what you’re actually doing is running your computer with the operating system that’s installed on the USB device. When you start your computer normally, you’re running with the operating system installed on your hard drive – Windows, Linux, etc.
Follow these easy steps to boot from a flash drive, an external hard drive, or some other bootable USB device.
Difficulty: Easy
Time Required: Booting from a USB device usually takes less than 10 to 20 minutes.
Here’s How:
1.Change the BIOS boot order so the USB device option is listed first. The BIOS is rarely setup this way by default.
If the USB boot option is not first in the boot order, your PC will start “normally” (i.e. boot from your hard drive) without even looking at any boot information that might be on your USB device.
Note: After setting your USB device as the first boot device, your computer will check it for boot information each time your PC starts. Leaving your computer configured this way shouldn’t cause problems unless you plan on leaving the bootable USB device attached all the time.
2.Attach the USB device to your computer via any available USB port.
Note: Creating a bootable flash drive or configuring an external hard drive as bootable is a task in itself. Chances are you made it to my instructions here because you know whatever USB device you have should be bootable after properly configuring BIOS..
3.Restart your computer.
4.Watch for a Press any key to boot from external device… message.
On some bootable devices, you may be prompted with a message to press a key before the computer will boot to the flash drive or other USB device.
If you do nothing, your computer will check for boot information on the next boot device in the list in BIOS (see Step 1) which will probably be your hard drive.
Note: Most of the time when trying to boot to a USB device there is no key-press prompt. The USB boot process usually starts immediately.5.
5.Your computer should now boot from the flash drive or USB based external hard drive.
Note: What happens now depends on what the bootable USB device was intended for. If you’re booting to an old version of MS-DOS on a flash drive, MS-DOS will load. If you’re booting to the DSL version of Linux, it will start. You get the idea.
If you tried the above steps but your computer did not boot from the USB device, check out some of the tips mentioned in video
USB is most innovated ideas which causes revolution in field of computers,currently USB 2.0 is used in most of the computers which leads to a very high data transfer as compared to the older ones but now USB 3.0 is launched , next generation USB. USB 3.0 much faster and safe as compared to USB 2.0 New USB 3.0 products are 10 times faster than USB 2.0 means data transfer speed upto 5 GB/ sec Faster power transfer (900 mA) in USB 3.0 as compared to USB 2.0 (just 500 mA) means increase in speed of scanning by USB scanner and other equipments. It also means that LAN connection will be replaced by USB 3.0 as it is much faster than LAN. But if you want actual speed of USB 3.0 than you have to use both USB 3.0 equipment and USB 3.0 ports, as in USB 2.0 ports, the speed of USB 3.0 equipments decreases and it will be same as USB 2.0 equipments or you can use the USB card adaptors as shown above.
USB 3.0 is a great improvement to USB 2.0. The biggest difference is the speed at which it can communicate with computer’s . USB 2 had a maximum speed of 480 Mbps, which was very speedy at its time but now it might not be enough because we now have USB flashdisk drives which are 64 GB in size, cell phone and PDAs that have a lot of internal storage built in, and even at 480 Mbps a full transfer of data in between devices can take a long time. So now USB 3.0 has a speed of 4.8 Gbps, almost 10 times faster than USB 2.0. Now if we want to transfer files from a pc to a 64 Gigabyte flashdisk to full capacity, we can do it in under 20 minutes!!